Lighting is an integral aspect of any video, but unfortunately, it’s an aspect that is often overlooked.
The great thing about lighting is there is no one right way to light your video. That’s because when done effectively, lighting has the power to set the mood of the video and draw the viewer’s attention to a certain aspect of the shot. Poor lighting can make a somber moment seem too light and a comedic video look too somber. Not to mention poor lighting could make your video grainy because there isn’t enough light for the camera. Pinpointing lighting directly on specific objects or people helps persuade the viewers to direct their eyes to the intended spot, which ensures that important aspects of the video are not missed.
The possibilities of how to light your video are endless.
One of the main reasons why lighting is so important is that it affects the overall quality of the video.
But if all of this sounds too technical and you don’t know where to start on how to light your videos then here is the most basic lighting technique.
THREE-POINT LIGHTING
When it comes to video lighting, three-point lighting is a tried-and-true technique that allows you to control how light and shadow fall on your subject, creating different moods and adding a professional touch to your videos. This is the standard form of professional lighting in video production. It involves using three light sources placed in three different positions. By playing with the size, distance, intensity, and position of these light sources, it is possible how light and shadow fall on a subject creating different moods.
The three types of lights used in a three-point lighting setup are:
Key Light:
This is the primary and brightest light source. It gives the shot its overall exposure. This light is positioned slightly off the side of the camera and in front of the subject. Placing the light at a 45-degree angle to the camera is a good rule of thumb, it creates shadows on the opposite side of the subject’s face giving it dimension and depth.
- Pro Tip – Avoid placing your key light too close to the camera. It will cause your lighting to become flat and featureless.
Fill Light:
Mirroring the key light on the opposite side of the camera, the fill light literally fills in the shadows that the key light creates on the subject. Typically, this secondary light is less bright than the key light, and videographers can control the overall mood of their shot based on how dim or bright they make the fill light. Together the key light and the fill light determine the overall mood of the scene.
- Pro Tip – It’s important that the fill light remains indistinctive and does not create more shadows because the primary function of the fill is to remove the shadows created by the key light. The closer the fill light is to the camera, the fewer shadows it will create.
BackLight:
The third source of light in this lighting technique, the backlight, shines on a subject from behind. This creates an outline around the subject’s head that pushes them away from the background and gives a sense of depth.
- Pro Tip – Non-diffused sunlight can often be too harsh to light your subject as a key light, but as a backlight, the sun can make your subject stand out.
- Pro Tip – To create a silhouette, expose your backlight and turn off your key and fill.
There is no set formula on when or how to use the three-point lighting setup. This often depends on the scene, the subject matter, and the overall mood you are trying to evoke. However, since three-point lighting is the standard for good lighting, there are reasons why you should light your videos using this technique:
- Good lighting creates a more interesting and dynamic image, where the subject is seen with more dimension.
- This lighting setup helps bring dimension to the people in the scene.
- Placing a soft key light slightly off-center is more flattering for the subject, by hiding skin imperfections and blemishes.
TIPS FOR SETTING UP THREE-POINT LIGHTING
There are several key components to setting up three-point lighting and creating a polished, professional video.
- Consider the light source, size, and distance. The size of a light source relative to the subject size determines how “hard” (sharp, distinctive edges) or “soft” (smooth, feathered edges) your shadows will be. The smaller the light source the harder the shadows, while a bigger light is softer.
- Consider the intensity of your light source. Brightness is how we measure a light source’s intensity. Deciding whether you use LED lights, fluorescent lights, or incandescent bulbs, determines the output intensity. Brighter lights create harsher edges and shadows.
- Consider the position of your light source. Where you place your lights relative to the subject and the camera determines where shadows fall. Your backlight and fill lights determine the overall mood of the scene.
The most important thing to remember when setting up the lighting system of your video is the ultimate goal of your video. If you are just starting out and want to create a clean, well-lit video then you’ll want to use the standard three-point system outlined above.
But remember if you take one light source out of a three-point light system then you won’t get the full benefits.
HARD VS SOFT LIGHT
Lighting creates a visual mood for a scene. There are two main types of lighting: hard lighting and soft lighting. When lighting your video it’s important to know the difference between the two types of lighting, how to create each, and which one works best for a given shot.
HARD LIGHT
Hard Lighting is a focused, often bright light that casts harsh shadows and draws attention to a specific part of the frame.
In hard lighting, there is a huge distinction between light and shadows. When a subject is lit in harsh light their silhouette will cast a distinct harsh shadow.
Think of hard lighting as how things look on a very sunny day.
HOW DO YOU CREATE HARD LIGHTING?
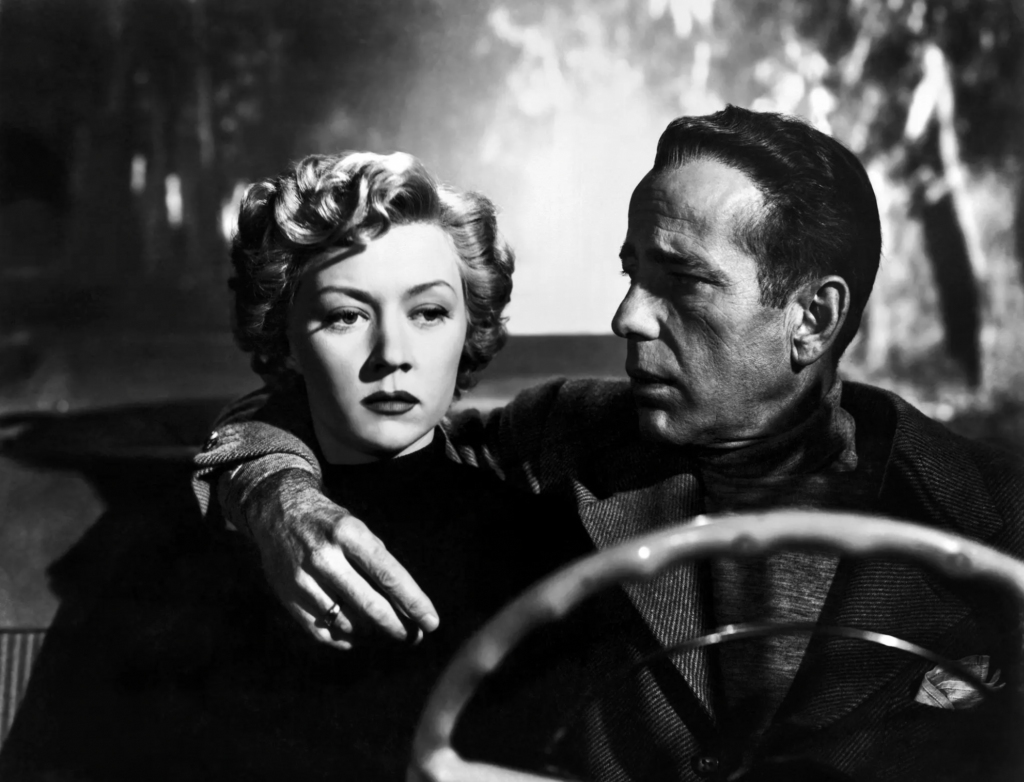
This type of lighting provides a high-contrast look to your shot and is created by setting up a single point of light that casts very distinct shadows. A good example would be the lighting in film noir.

Do you see how Humphrey Bogart is completely in shadow while she has a harsh shadow on the side of her face? That’s hard lighting.
A camera flash or a flashlight are also good examples of hard light.
SOFT LIGHT
Soft lighting is often categorized as bright and with very few hard shadows. When your subject is lit in soft light there will be little to no shadows on their face.
Think of soft light as how things look on a cloudy day; the cloud diffuses the light from the sun, lighting the object from every direction, this is soft light.
HOW DO YOU CREATE SOFT LIGHTING
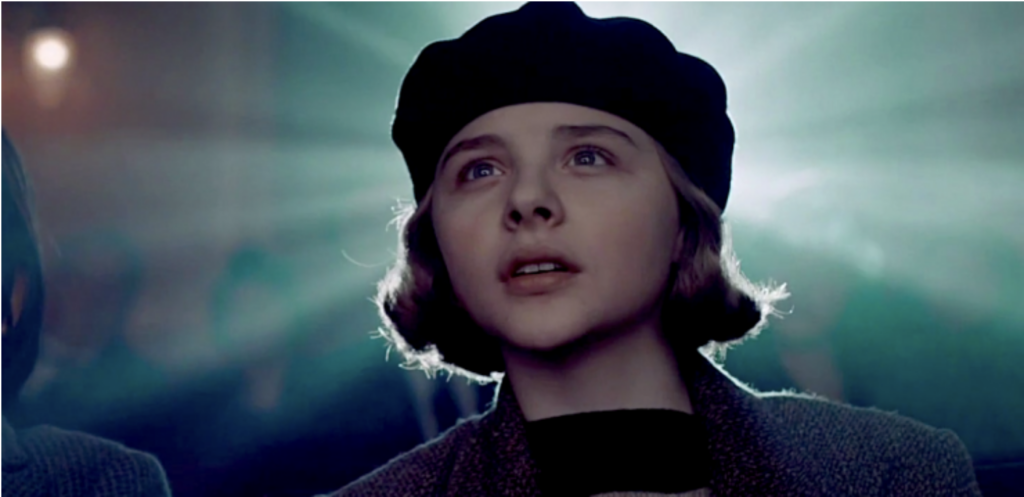
To create soft light, set up a light and bounce it off a reflector or light through a thin piece of white material. A ring light is usually considered soft lighting because it has diffusions panels. If you don’t have any lighting equipment you can use the natural light from your window on an overcast day.

The image above is a perfect example of soft lighting because while there are shadows in the shot, there are no harsh shadows on the face.
WHEN TO USE HARD LIGHTING VS SOFT LIGHTING
Hard light and soft light create very different visual moods.
- Hard light adds dimension, depth, and complexity to the subject. The high-contrast nature of hard light creates a strong sense of drama in the frame.
- Soft light is more flattering than hard light. It’s more natural-looking and makes the subject appear warm, welcoming, and friendly. Soft light is more forgiving and can bring out the light in someone’s eyes.
Lighting can strengthen the emotion of a shot and help tell the story when you get it right. Meaning, you use hard and soft lighting effectively to match the mood of the scene. Hard light is perfect for building tension and softer lighting is ideal for those warm, feel-good moments.
COLOR TEMPERATURE
You understand color temperature, even if you don’t realize it. Think about the last time you visited an office building or hospital, you can probably see the bright fluorescent cool white lights so vividly making the place feel cold and sterile. Now compare that to the lighting at a candlelight dinner at a nice restaurant, it’s darker and the little light that is being used to light the table is a warmer white, giving the room almost a yellow tint and making the atmosphere a cozier feeling. That’s the difference.
You can choose either cool or warm lights for your video lighting but it’s important to remember to use all of the same color temperature bulbs, don’t mix cool and warm lights because this will result in poor lighting quality.
FINAL THOUGHTS
Lighting is a critical factor that directly impacts the quality of your video. From fluorescent lighting to issues with exposure, poor lighting can strain your viewer’s eyes and lead them to scroll past your content. However, having great-quality videos means nothing if you don’t know how to create captivating videos that truly engage your audience. If you’re looking to take your video marketing to the next level, our video strategy solutions can help you unlock the secrets to creating binge-worthy videos that captivate, connect, and drive results.
If you have more questions about how to light your video or filming in general, download my free guide: How to Film Yourself Like a Pro. It’s packed full of useful tips and tricks to help you make professional quality videos with the equipment you already have.
Comments +