Video editing is a creative and dynamic process that involves taking raw footage and transforming it into a finished product that tells a compelling story. As a professional video editor, I can confidently say, video editing is an art that requires a lot of patience, creativity, and technical skills. While there are no definitive rules to video editing, there is a process to learn and master.
For beginners in video editing, having and maintaining an efficient workflow is especially important. Learning and implementing an efficient workflow is critical to ensure that the editing process is smooth, streamlined, and effective. Maintaining an efficient workflow can help you to manage your time better, increase your productivity, and create high-quality videos.
Having an efficient workflow is critical to ensure that the editing process is smooth, streamlined, and effective. An efficient workflow can help video editors to manage their time better, increase their productivity, and create high-quality videos.
I understand that video editing may seem overwhelming, but with the right tools, guidance, and a step-by-step process, it can be a fun and rewarding experience.
However, it is important to note that every video is different and your process should be adjusted accordingly. Every video has its own unique requirements and challenges, and it is up to the editor to tailor their workflow to ensure the best possible outcome.
With that said, here is a general editing process that most projects will follow:
STEP 1: ORGANIZE FOOTAGE AND SYNC AUDIO
ORGANIZE FOOTAGE
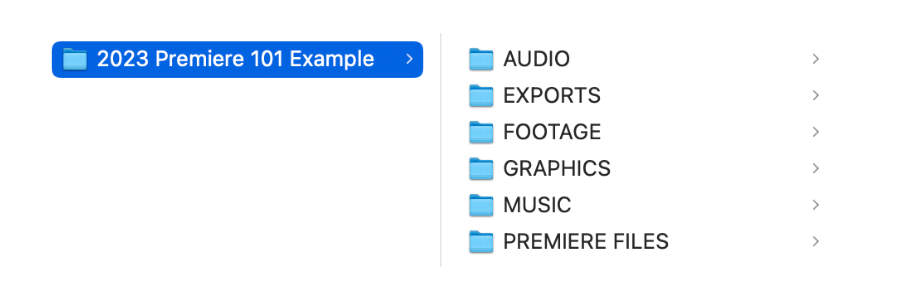
The first step in the video editing process is a crucial one – organizing footage and syncing audio. This step requires importing all the raw footage and audio files and sorting them into manageable clips. Make your life easier down the road by keeping your work organized from the start. Whether working off an internal or external hard drive, start every project by creating a project folder. This folder will contain all the files related to your project, placed accordingly in the following subfolders:

Always knowing where your files are located will save you tons of time and improve your workflow efficiency. Plus, this makes it easy to come back to your project at a later date or avoid the dreaded ‘media offline’ error message.
CREATE BINS
Before you can even think about bringing footage onto your timeline, you need to get your footage ready to edit. Nothing hinders editing quite like an organized media pool. Not finding the desired clip within a few seconds can quickly turn a fun project into a tedious chore.
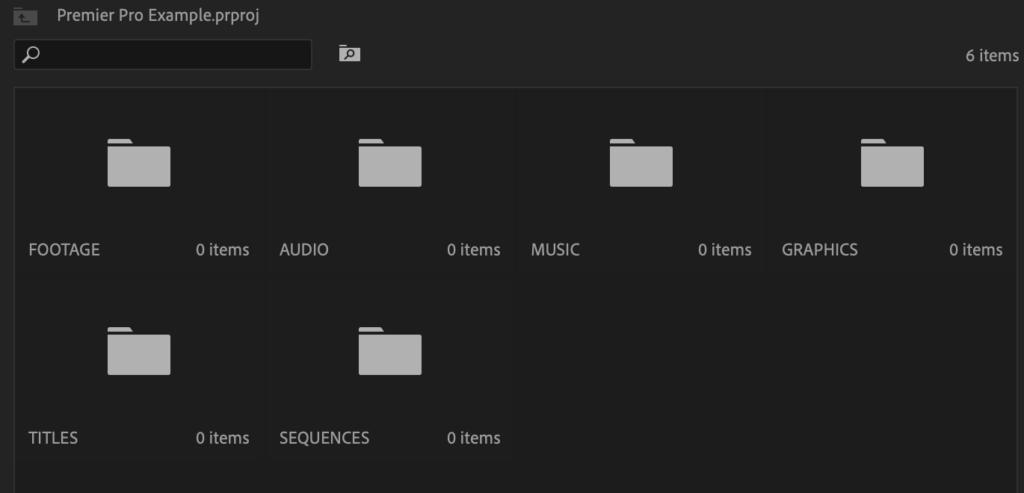
Every editing software is different but it’s important to make folders within your project to keep everything organized after you’ve imported everything. In the Premiere Pro project window, creating bins will allow you to organize everything more efficiently. Bins are basically folders where you can store your assets. In order to create one, just right-click within the project window and choose “New Bin” (or ⌘+B / CTRL+B).
For most projects, I create the following bins:

Depending on the scope of your project, you’ll find the need to create sub-bins for more specific categories (ex. b-roll and After Effects renders).
SYNC SOUND
Before you start editing your material, you’re going to want to sync your audio to the footage. Syncing sound in video editing refers to the process of aligning audio tracks with their corresponding video footage to ensure that they play together seamlessly. This step is particularly important if the audio was captured separately from the video, such as in a multi-camera setup or when using external audio recording equipment. If the audio was recorded using the camera’s built-in microphone syncing may not be necessary. But, It is always a good idea to check if the audio is synced with the video before you start editing.
STEP 2: STRING OUT
While it’s tempting to jump straight into the edit and start flooding the timeline with various clips, it’s better first to string out and review all your media. Even if you’re a self-shooter and know that one shot is better than the others, you may find a shot that works better upon review.
To begin this step, you will first import all of your footage into your created bins. Then, you’ll create a new sequence that will be used as your “string out” sequence. In this new sequence, you’ll start reviewing your footage and selecting the best takes. As you go through each clip, mark in and out points to indicate the specific sections you want to use.
During this step, keep in mind the overall story or message that you want to convey in your final video. This can help you make decisions about which clips to include and which ones to discard.
STEP 3: ROUGH CUT
The rough cut is a blueprint, a foundation to work upon and refine. It involves assembling the selected clips from the string out sequence into a rough version of the final video. Like an artist who begins a painting by creating a sketch, the rough cut provides an initial structure to build upon and refine.
The edit doesn’t necessarily have to be neat, but the content should be understandable and flow naturally. You may find that some shots linger too long, and others are too short. The goal during this phase is to make sure the story flows and the video mirrors the intended product.
In the rough cut, it’s common to use placeholders for graphics or text instead of spending time creating these time-eating elements. Remember, a rough cut is not the final edit. It’s a rough version that allows you to see the overall structure of the video and make decisions about how to refine it. You can continue to make changes to the rough cut until you are happy with the overall structure and pacing.

STEP 4: FINE CUT
Now that you have the overall foundation set, it’s time to build upon it by refining the edit. This is the part of the process, where you make sure the edit flows seamlessly.
In the fine cut, you are revising any intricate issues that you passed over in the rough cut. This is where you focus on the details to ensure that it meets the desired standard. The editor takes a more critical approach to the video, looking for any issues that were overlooked in the rough cut.
During the fine cut, focus on the details you may have missed during the rough cut, such as the horizon being slightly off or a cut on the action being off-cue. You should also ensure that every shot in the video is the perfect length and remove any unnecessary footage that could affect the flow.
If you used placeholders for animations, text, or music in the rough cut, this is where you must replace them. Add music and sound effects to match the video’s tone.
STEP 5: FINAL EDIT
This step involves reviewing and refining the fine cut to ensure that the video meets all the necessary requirements. The final edit is the last chance to make any necessary adjustments to the video before posting. This is the chance to review your work.
This step is different than the previous one because it involves scrutinizing and tweaking your work. The changes are generally small, such has adjusting audio levels or color grading the footage to make sure all the colors in the video are consistent. Once you are done polishing and you’re satisfied with the results, it’s time to move on to the final step.
STEP 6: EXPORT
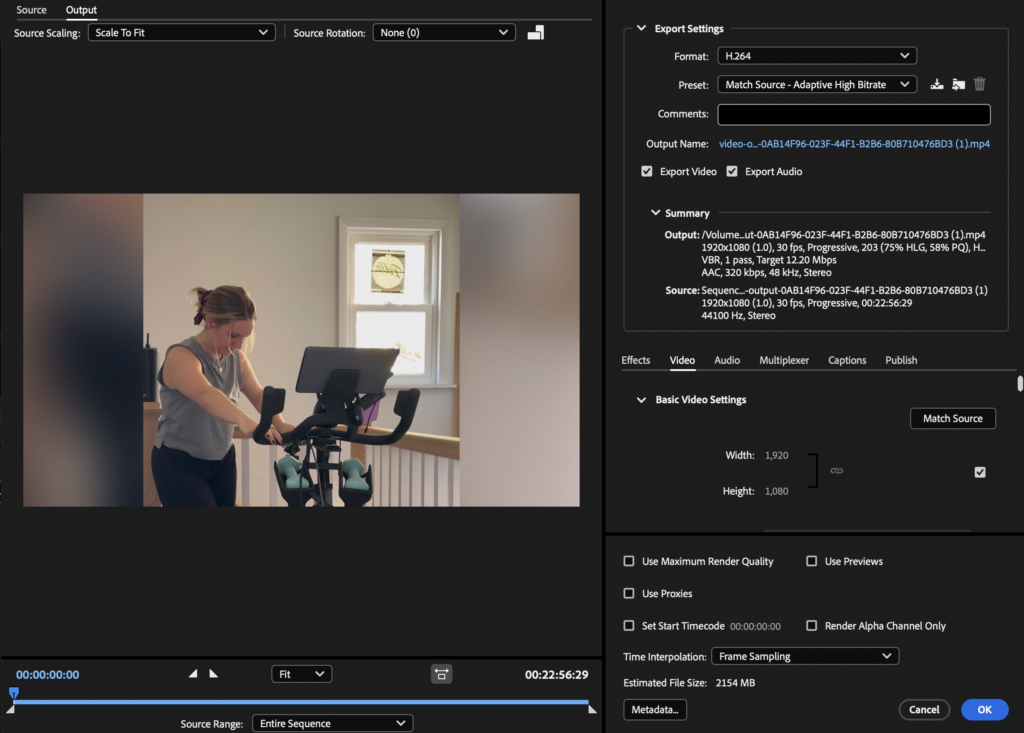
Now that your edit is complete and ready for delivery, there’s one step left. Exporting a finished video. This is where you’ll render and format the video for the platform. Again, the exact process of exporting your video will depend on your editing software but there is a general process to follow:
- Navigate to the export or render tab in your video editing software.
- Select the format you want to export your video in. This could be a specific video format or a device-specific format like MP4, MOV, AVI, etc.
- Choose the resolution and aspect ratio of your video. This should be based on the intended use of the video. For example, if you’re exporting a video for YouTube, the recommended aspect ratio is 16:9. For Tiktok, it will be the inverse.
- Select the video and audio codec. Codecs are used to compress and decompress video and audio data. H.264 is a widely used video codec that provides high-quality video while keeping file sizes relatively small. It is supported by most devices and platforms. Quicktime, on the other hand, is a container format that can contain a variety of codecs. It is a popular format for Apple devices and provides high-quality video and audio.
- Choose the frame rate and bit rate. The frame rate determines the number of frames displayed per second, and the bit rate determines the quality of the video. Higher bit rates provide better quality but result in larger file sizes.
- Choose the destination folder where you want to save the exported video and click on the export button.

SUMMARY
Video editing is a crucial component of any video production, and following a structured workflow is essential to creating high-quality videos. Video editing can be overwhelming when you first start out, unless the workflow is broken into more manageable steps. The process I have outlined can provide a clear roadmap for beginners to follow, ensuring that they don’t miss a crucial part of video editing. Skipping steps can sometimes be the difference in amateur and professional quality. By following this workflow, I can assure you that your videos will be high quality and effectively convey its message.
As a professional video editor, I understand the importance of following a structured workflow. I, myself, follow this workflow to ensure every video I make is high quality and exceeds expectations. Round Our World offers a wide range of video editing services, including corporate videos, social media videos, product videos, logo animations, and more.

Do you want your video content to stand out and capture your audience’s attention? I can help you with that! My video editing services are available for a single project or as a monthly retainer, depending on your needs. With my years of experience in the industry, I can transform your raw footage into a professional and polished final product that will engage your audience. Book your project today!
SHORT RECAP
Our Step-by-step video editing workflow:
- Organize, Import, and Sync your footage
- String Out: Watch everything you have and choose the best footage
- Rough Cut: Start crafting your story with the clips selected
- Refine Cut: Add graphics and transitions and work on the flow of the video
- Rewatch, refine cuts, and adjust audio
- Export final video
Comments +